Tuesday, August 10, 2010

Fall 2010 Styles and Color


Hairstyles for Fall 2010


-messy


-bed hair


-less traditional


-textured styles


-messy buns


-sleek ponytails


-Farrah Fawcett curls


-center parts


-blunt bangs


-mushroom cuts
Fall Haircolor
Many women love to go with dark hues for colder months and one of the hottest colors for this fall ranges in the copper family. Women should stick with dark chocolates, golden blondes and deep mahogany's. Be sure to get your hair done with a professional to get the right hue for your skin tone.


Sunday, August 8, 2010

Back to School Hair Ideas

The kids are heading back to school in the next couple of weeks. Below are a few back to school hair ideas mostly for teenage girls.


-Knit Headband
Accessories add to any style.


-Playful Pigtails

Create soft waves with a large barrel curling iron, then make a center part and split hair into two sections. Start to weave each into a braid behind the ear, then secure with elastic and wrap a piece of hair around it.


-Bold Bubble Pony

Put hair into a ponytail. Tease the entire pony with a rattail comb then, add an elastic every few inches.


-Cornrow Braids

Part your hair on the left side. Start braiding to the right of the part along your hairline. As you braid add in pieces from both sides to continue down the side of your head but, as you add the pieces pull them underneath the braid. Braid down to behind your ear then stop adding pieces. Finish braiding regularly to the ends then secure with elastic.


-BoHo Braids

Part hair in the center. Separate out a one inch section on each side of the part-two inches back from the hairline. Take a two inch piece above the ear and clip out of the way. Pull the rest of the hair into a low bun. Bobby pin it against the nape of the neck and tuck the ends. Braid each of the top sections down and pin the ends into your bun. Then braid the side sections over your head. Pin the ends against your head and smooth with pomade.


Friday, July 30, 2010

Sunscreen

Sunscreen

According to an article on msnbc's website, young adults are less likely to put on sunscreen when they are exposed to the sun than older adults. There are many excuses for not wearing sunscreen. I know with me it is time consuming and I really don't like the way that it feels which is a very common excuse. Really those excuse are minor when you compare them to wrinkles and possible skin cancer. I found that the article was very informative so here is the link http://www.msnbc.msn.com/id/3076469/.

Reasons Why You Should Wear Sunscreen
  • avoiding sunburn
  • cuts down on skin cancer risk
  • keep skin wrinkle free
  • prescription worries

Some 2010 Top Sunscreen Brands

  • Alba Botanic
  • All Terrain
  • Badger
  • Blue Lizard
  • California Baby
  • COOLA
  • Hara Body Care
  • Johnson and Johnson
  • Loving Naturals
  • Soleo Organics
  • thinkbaby and thinksport
  • UV natural

Look for these....

Ingredients:

  • zinc
  • titanium dioxide
  • Avobenzone

Products:

  • cream
  • broad-spectrum protection
  • water-resistant for beach, pool and exercise
  • SPF 30+ for beach and pool

Do these things before applying sunscreen:

  • don't get burned
  • wear clothes
  • find shade or make it
  • plan around the sun
  • sunglasses are essential

Thursday, July 29, 2010

How to Improve Your Complexion

Cleanse Daily

If you have dry skin you will need to pump a little moisture into your face with your soap. Look for brands of soap that contain either glycerin or a type of silicone, such as cyclomethicone or dimethicone.

If you have oily skin you are going to want to dry up some of the grease with your soap. Oil is like a glue that sticks all of the oil and bacteria to your face. In turn this clogs up your pores and starts the cycle of eruptions and breakouts. Use a soap that contains salicylic acid.

If you have sensitive skin you are going to need something a little milder than the typical ingredients. The important ingredient for sensitive skin types is propylene glycol.

If you have normal skin use soaps that use lanolin, an extract from the oil gland of sheep.

Tone Daily

Toning is the process of removing dead skin cells from your face so that the only layer visible is one of bright and healthy new cells. The average human generates a new layer of skin every 2 to 4 weeks. You can improve your complexion tremendously by sloughing off dead skin cells and getting rid of excess oil with toner. Toning also helps to pH balance your skin after cleansing.

Moisturize Daily

Having cleansed and then toned your face, your going to need to do a little mending. Those first two stages can be little rough on the skin and even if you use products especially designed for your face's chemistry, you may nevertheless have dried it out a little. In any event you will want to create a protective barrier on your newly pampered skin. Moisturizers act in two ways: by throwing up a barrier that traps water in your skin and by pulling water out of the air. One kind acts like a dam and the other acts like a humidifier.

Use Sunscreen

There are two types of UV rays that can damage the skin. The first UVA rays are known as "tanning rays" and are used in may sunlamps and other sources of artificial tanning. UVB rays are the type that cause sunburn. Using moisturizer that contains SPF 15 or higher can protect your skin from sun damage.

Thursday, July 22, 2010

How to Make Eyelashes Appear Fuller

Tips on How to Make Eyelashes Appear Fuller


Things You'll Need:

-eye lash curler

-lash primer

-curling and plumping mascara

-eye liner or dark shadow


1. Line the top of each lash with dark eye liner or shadow. Blend well into the roots of the lashes.


2. Gently apply heat to an eye lash curler with a blowdryer on the low setting for 10 seconds or less. Carefully curl lashes from the base. Be sure to test the curler on the back of your hand before applying the heated metal to your lashes. Hold for 30 seconds or until the curler cools.


3. Prepare lashes for mascara with a coat of clear lash primer. This will help prevent flaking which is common with mascaras that add bulk.


4. Apply a volumizing mascara with a curved wand. Begin at the base of the lashes, gently shaking the wand back and forth to add bulk at the bottom. Fill in the outer lashes with the pointed tip and extend them outward. Gently touch the lower lashes just a bit, without shaking the wand.

Tuesday, July 20, 2010

Bronzing Tips

Bronzing Tips

You can achieve a sun kissed golden glo this summer without the sun's damaging rays glominerals has an entire category of products dedicated to giving your skin the glo you crave, guilt free and sun free!


gloSheer tint base bronzing gel


Apply with fingertips or foundation brush over face, neck and decollete to achieve a sheer bronze glow. Can be applied alone, on top of or underneath base.

*Mix together with your favorite foundation for just an added hint of bronze.


gloShimmer brick


Swirl together for a captivating glo or use individually to create endless dazzling looks.

*Apply with a texture brush to make a subtle impact. The specialized brush allows for very sheer application.


gloBronze

Dust on lightly to add color or contour or apply liberally for a sun tanned glo. Ideal for face or body.

*Looks great on collar bones. Available in one or two toned options.

Tuesday, July 13, 2010

Makeup Brushes


How to Clean and Store your makeup brushes!


Basics:


-All brushes should be cleaned after each application with brush cleaner. This is very important to avoid bacteria growth.


-To avoid color contamination, wash your brush at the end of every week.


-To clean brushes, spread bristles with your thumb and with the other hand spray brush cleaner repeatedly. Make sure it get inside the brush for optimal disinfecting. Wipe with tissue. Repeat if necessary.


Deeper Cleaning:


-At the end of the week or depending on how much you are using your brushes put a small amount of non fragrance gentle formula shampoo in a bowl with warm water. Place brush in small bowl making sure not to fully submerge brush hair and swirl around until all makeup is removed. Squeeze out any excess water from brush. Do not pull to hard as to damage the brush bristles. Lay on towel at incline to dry.


-Replace warm water and shampoo when water becomes cloudy.


-Allow 24 hours before using or storing your brushes.

Thursday, July 8, 2010

How to Match Foundation to Your Skin

How to Match Foundation to Your Skin

Step 1: Visit a salon or department store without any makeup on. Ask for assistance in picking out the foundation. Request to have small dot of different foundations applied to your skin.

Step 2: Go outside and check the foundations in natural sunlight. Purchase two or three shades of liquid foundation that closely match your skin tone under natural sunlight.

Step 3: Cleanse and moisturize your face when you are ready to apply your makeup.

Step 4: Blend all of the foundation samples together and apply a bit of the blended mixture on your face with a sponge.

Step 5: Examine the results and determine if you need more or less of a specific foundation color. Experiment with the different foundation colors by blending different amounts of foundation together and applying them to your skin until you get the perfect color match.

Step 6: Mix the right amounts of foundation together each time you apply makeup.

Other Tips:
-Choose a concealer at least a shade lighter than your foundation.
-Avoid buying makeup at drugstores; may not be as fresh.
-Buy different foundation for the summer and winter since, the skin tones change from season to season.

How to Apply Lipstick and Lip Liner

How to Apply Lipstick and Lip Liner

Step 1: Consider your lipstick color and finish. You'll do well with colors that match the natural shade of your lips, opting for darker tones that compliment your overall coloring. Matte lipsticks offer a muted finish complimentary to workday makeup, while satin and gloss finishes offer appealing evening looks.


Step 2: Apply all other makeup before you put on lipstick and lip liner.


Step 3: Begin by dabbing on a small amount of lip balm to give your lips a little moisture.


Step 4: Draw a thin line along the edge of your lips with a lip liner whose color is one shade darker than your lipstick. Start at the center of the upper lip and work outward. Hug the very outer edges to open up thin lips, and line well within the edges to downplay excessively full lips.


Step 5: Apply lipstick from the tube or by using a firm, small lipstick brush. Coat the lips evenly. Pay special attention to staying within the lips' edges.


Step 6: Blot to remove any excess color and to even out the texture.


Step 7: Remember to touch lips up after a meal as lipstick easily transfers on to cups.


Thursday, July 1, 2010

Bangs!!!!

Bangs!!!

When selecting bangs consider these factors:

1. Hair type
When cut and styled correctly bangs can actually help fatten naturally thin or fine strands. Side swept bangs might give the impression of fuller strands whereas feathered or wispy bangs might negatively highlight thinning strands.

2. Hair texture
While perfect for naturally straight hair or hair with some bend, bangs can be horrible for naturally curly or super wavy hair.

3. Hair length
The length of bangs can range from super baby short to long. Depending on the overall look desired, bangs can be cut to blend with the overall hairstyle and cut. Bangs can also be utilized to blend an uneven or disastrous cut.

4. Condition of Hair
Bangs may not work well for hair that is prone to breakage or has been chemically damaged. Each situation would need to be addressed with your hairdresser. Hair which is prone to oiliness may prone difficult when worn with bangs. This is especially true when oily strands are coupled with oily skin.

5. Face shape
Once you have considered all hair related challenges, the face shape should be analyzed to select the very best type of style to frame the face. Bangs should flatter and help as a beautiful curtain of tresses.


Face Shapes:

Oval: the oval face shape is considered to be a face shape that can wear any type of style or hair. This includes bangs that can be worn in just about any style. Of course bangs for oval face shapes should be chosen with an eye for hair type, texture, length and condition.

Round: the most flattering bang styles tend to be built upon long softly layered or feathered bangs ( if your hair texture, type, condition support feathered bangs) which gently hug the cheek areas to minimize round cheeks. When skillfully constructed bangs can add beautiful contour to round fact shaped features. Great bangs can instantly chisel into the cheekbones and help them pop.

Long: blunt brow hugging bangs that softly drape over the forehead will help to give the impression of a more oval shaped face. The oval look can be strengthened by opting for long or graduated layers that softly caress the sides of the face.

Square: consider side swept curve or taper inwards towards the jaw to soften pronounced square facial lines. When well cut side swept bangs can also help soften all of the angles of the face.

Heart: depending on the ultimate goal, bangs can be selected to either minimize the general wideness of the heart shaped face or help to balance the generally prominent chin. A side swept feathered or textured bang style can also be another great option. A heart shape face can usually carry off full bangs cut straight across the face. Long or short full bangs can look really good for a heart shape.

Triangular: wider bangs that are feathered, wispy or texturized can help to balance the face and create more of an oval face. A slight wispy fringe will cover and conceal a wide forehead. It will also bring it into a better proportion with a wide chin. Avoid the flat pageboy fringes. These can level out fullness and height.

Types of Bangs:

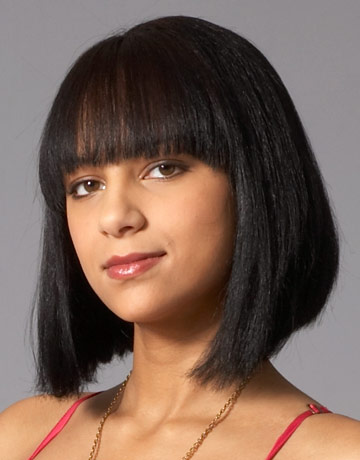
blunt bangs: worn just below the eyebrow these forehead fringes are cut precisely straight across from side to side

side swept bangs: cut so that the hair tapers from shorter to longer lengths and is extended generally from a side part with the hair brushed to sweep across the forehead.

parted bangs: usually worn as a modified version of blunt bangs, these bangs are cut so that they part slightly in the middle or off to one side.

choppy bangs: another modified version of the blunt bangs; these bangs are texturized for a choppy look

asymmetrical bangs: these have a wide variety of lengths with one side being a lot shorter than the other

Wednesday, June 30, 2010

Style Your Hair in 30 Minutes

Styles that can be done in 30 minutes or less...


Coat damp hair with a straightening cream. Blow dry and quickly flat iron. Take a pomade and work through the top layer to make this straight style a little more rock and roll.


Get long, cascading curls with high shine. First wash and deep condition so you get a healthy, glossy shine. Dry hair with a round brush. Then use a large curling iron and alternating two inch sections, roll hair around the barrel in one direction and then again in the other direction to create a ripple effect. Once your done spray everything with aerosol shine spray.


Use a small curling iron (holding it parallel to your head) and wrap small sections (about an inch)around the barrel for a glam 40's look. Do your entire head curling all the way up on one side of the part. Vary how much curl you get on the other side so you leave a bit of super smooth roots on one side. Spray your whole head with a setting spray and a bit of shine spray when you're done.


For a modern looking bob keep hair well moisturized and massage your scalp gently even when you don't wash your hair. Place small sections into large rollers. Remove the rollers and blow dry on a very low heat. Flat iron your bangs for a finishing touch.


Wash hair with a shine boosting shampoo and conditioner to get a little extra gloss in the shower. Spray a volumizer all over and then blow dry hair with a round brush. Set two sections of hair with large velcro rollers, allowing them to sit for at least 20 minutes. Remove rollers and mist entire head with hair spray.


Run a styling cream through hair before blow drying. If your hair is super straight veering towards flat, dry hair without a brush and then smooth with a styling cream when everything's dry. Flip hair over and mist with extra shine spray for extra gleam.

Thursday, June 24, 2010

Benefits to Buying Locally


Fix Salon Studio is participating in the green contest that is taking place throughout the city. The last blog was done on soy candles that are made and sold locally. Below are the top 12 benefits of shopping locally...


1. Money Spent Here Stays Here


2. Jobs and Wages


3. Stronger Tax Base


4. Local Business Owners Invest in Our Community


5. Better Variety


6. Convenience equals Savings


7. Green Friendly- Shopping locally reduces your gas consumption and pollution. Also local stores help to sustain vibrant, walkable communities, reducing sprawl and the need for automobiles.


8. Keeping local dollars in the economy


9. Local Character and Prosperity


10. Friends and neighbors


11. Non-profits receive greater support


12. Community Well-being

Breathe Soy Candles


Breathe Candles are earth friendly, 100% natural soy wax and are hand poured here locally in Charleston.


Benefits of Soy...

-non-toxic, clean burning and 100% biodegradable

-cleans up with soap and water

-burns 30-50% longer

-longer lasting scent

-derived from all natural vegetables

-purchases support American farmers

-simply better for you, your loved ones and the environment

-100% essential oils used for scents


A Few of the Scents...

-Bamboo Teak- wonderful contemporary fragrance of citrus notes and ripe olives for a natural spa scent


-Tranquility- hint of wonderful spring flowers such as sweet jasmine and honeysuckle. Smells just like the south in the springtime


-Lemongrass Vanilla- a crisp, fresh lemongrass with a hint of vanilla; a light and relaxing spa scent


-Tuscan Sun- a sweet, pure scent of violent, chamomile, jasmine and orchid blended together in a floral base.


-Harvest Moon- This scent has the smell of fresh pumpkin pie with brown sugar, butter and all of the good spices of fall.


The candles come in various sizes. There are several places in the Charleston area that carry the Breath soy candles; Fix Salon Studio being one of them. For more information check out the Breathe website http://www.breathesoycandles.com/.

Thursday, June 17, 2010

How to Apply Eyeshadow


Applying eyeshadow can be pretty tricky. We don't want uneven or eyeshadow that is not blended well. Here are some tips that will help all of us with our next eyeshadow applications:


#1. Blending is key

The best way to blend is to start light then go darker. Brush the base color from the eye all the way up to the brow bone (this is the lightest color), apply the lid color (medium color) and then apply the highlighter (darkest color). Be careful not to be to heavy-handed.


#2. Choose shadows that make the color of your eyes pop

Matching the color of your eye with a shadow actually brings the color of your eyes out. At the same time contrasting colors make your eyes pop too. (i.e. gorgeous golds with blue eyes)


#3. Never apply deep color to your brow bone- unless you are doing a cover shoot for Vogue

Apply shadow up to the brow bone but, not on the bone.


#4. Highlighter can make or break your look

When applying dark shadow to the crease of your eye, be careful to blend only the outside edge. Get to close to the eye and you will cause your eyes to look teeny and beady.


#5. Set shadow with a great base

The secret to keeping shadow in place for hours is a shadow base or primer.


#6. Shimmer is hot but, plays up wrinkles

Shimmer makes eyes really pop but it also highlights heavy lids, lines and wrinkles. If you don't have wrinkled eyelids try this great look for shimmer: create a nude lid but apply a bit of gold shimmer to the brow bone.


#7. Smokey is great but keep it to the lid

Keep color to the lid and just under the lower lash line. Don't extend color above the crease.


#8. How to pair shadow with red lips

Remember the beauty rule "Thou shalt not play up the lips and the mouth." If you are going for dramatic red lips, cover unsightly blue lines on lids with a concealer or shadow primer and then keep eyeshadow light.


#9. Make eyes brighter with white

A dot of white eyeshadow or pencil on the inside of the eye near the tear duct will make eyes look brighter. You won't believe how eye opening this is.


#10. Go for color

Taupe and lavender look great on all eye colors. Also consider mixing shades.


Tuesday, June 15, 2010

Eyebrows are the frame to your face!


Eyebrows are the frame to your face!


How to brow:

brow stencils- perfectly shape the brows

brow powder- fill in sparse areas

spoolie brush- tame unruly brows

brow wax- keep hairs in place

tweezers- get rid of strays

highlighter- enhance arch of the brow

angled brow brush- perfect for applying brow powder


Five Brow Fixes...


No Arch: Create the illusion of a perfect arch with this simple trick- brush brows up and angle out with the spoolie brush, then apply brow highlighter under the outer half of brow. Also, be careful to never overtweeze the tail ends of the brows; without them you can't create an arch!


Gaps: If your hair doesn't grow in certain spots (or you overplucked an area) fill it in with brow powder using the brow brush. Be sure your brows are dry and free of moisturizer for an even brow powder application.


Wrong Color: Temporarily change the shade of your brows with brow powder. If they are to fair try brown if they are to dark try blonde or taupe. Don't push down to hard on the brush. Color the hair not your skin.


Too thin: Put down the tweezers for at least a month and with a brow pencil draw short, feathery strokes throughout your brow in the same direction of the hair growth.


Too busy: Use tweezers and a brow stencil to clean up the shape of your brows by removing hairs that fall outside of the area defined by the stencil. Be sure to pick the right stencil for your brow shape and position it correctly.


Friday, June 11, 2010

What Causes Gray Hair?


What Causes Gray Hair?


Most of us get those dreaded gray hairs occasionally even if we are still in our 20's; at least I know I have tons of them. I think the causes of gray hair are very interesting. Some of these I have never thought of.


A little science lesson:

Our hair follicles consist of cells known as melanocytes which, produces pigments called melanin. It is the melanin that determines the color of our skin and hair. The more the production of melanin the darker the skin and hair and when the production decreases the hair becomes transparent. What appears as gray hair is actually transparent. It appears gray because of the surrounding dark hair. As people get older the production decreases and this causes gray hair however, there are other causes of gray hair.


Causes of gray hair:


Heredity- Heredity is considered to be the main cause of gray hair. People whose parents or grandparents have had gray hair early are most likely to gray early as well.


Medical or health problems- Another cause is poor health. Gray hair is usually seen in people with vitamin B-12 deficiency, anemia and a thyroid imbalance.


Smoking- People who continuously smoking don't produce as much melanin therefore, they began to gray.


Emotional Stress or Shock- It is believed that emotional stress or shock can cause gray hair.


Other Causes- Environment, Pollution, Exposure to UV rays and chemicals.


Many people with gray hair use color to cover it up however, others use their gray hair as a style statement.

Wednesday, June 9, 2010

Paul Mitchell/Matter of Trust


Who knew that while getting their haircut they would be helping cleanup the oil spill in the Gulf Coast? That is what an organization called Matter of Trust, based in California is doing. The organization is collecting hair from salons across the country and creating booms which are pantyhose filled with hair and hair mats. The booms and mats are then used to soak up the oil.


Paul Mitchell salons and schools continue sending hair clippings, funds and support to help with the Gulf Coast oil spill and of course the other oil spills that occur each year. Paul Mitchell became involved in the effort to cleanup oil spills when Phillip McCrory, from a Paul Mitchell focus salon in Alabama called John Paul DeJoria, CEO and Cofounder of John Paul Mitchell systems after the 1989 Exxon Valdez spill. McCrory discovered that hair could help after seeing that the fur on the Alaskan otters was soaked with oil. That is when Paul Mitchell became involved with Matter of Trust.


Paul Mitchell and Vanguard College of Cosmetology, a Paul Mitchell partner school has teamed up and set up a distribution center where the salons across the country can send the collected hair. Hair donations are received daily but they desperately need nylon pantyhose.


The girls are Fix Salon Studio are collecting clean used pantyhose to help in this clean-up effort.
(The picture above is of hair booms made by Vanguard College of Cosmetology.)

Thursday, June 3, 2010

2010 Men's Hairstyles

2010 Men's Hairstyles

I am sure there are a lot of men out there who would love to have a new hairstyle although, most would not be willing to admit it. Below are some of the hottest men's hairstyles for 2010. For guys who need a clean-cut style for work or just want a classic look there are three hairstyles shown below. Also, for the trendy guy who really wants something different there are also three styles shown. One of these styles is sure to fit any guy's lifestyle and personality.


Classic Styles


Classic Cut


The classic haircut is really popular for 2010. One of the styles that you see a lot of is the slick back look or the wet look which is inspired by the 1950s. This is definitely a timeless look. Also, another classic look is a precise side part. Try parting the hair from left to right. This cut is very easy to replicate and very straightforward when it comes to styling this cut.


Naturally Distinguished


This look is all about being yourself and not stressing too much over your hair. Of course, it doesn't mean that you should just let yourself go and not do anything with your appearance. Although, it does mean that if you have salt and pepper hair you can leave it that way. As long as the cut is neat and clean cut then hair color really doesn't matter. This look is perfect for the person who doesn't want to deal with hair color, but keep in mind the cut needs to be maintained.
Buzz Cut


The buzz cut is another timeless style that is prominent for 2010. In order to maintain this look your hair should be kept as short as possible and it definitely needs to be the same length all over. Men who have receding hair lines will benefit from this cut. Also, the cut is very low maintenance for that fast pace lifestyle.


Trendy Styles


Textured fronts

The textured fronts style is best for younger men. This style has bangs and is brushed forward and textured. The front of the hair should be about brow length. The back and sides of the hair should remain shorter. To create texture apply wax or pomade to the front of the hair.


Messy Top

Messy tops suggest a lively personality. This is a great way to give a man a short cropped cut but, at the same time leave some length on top. This style is layered and works best on hair with a natural wave. Also, hair mousse should be used on this style. This style is suited for a man in the creative field not so much the strict business world.


Long on top

This cut is ideal for men who like a little length and who have straight hair. This cut starts out longer on top and then tapers into a much shorter length overall. You can pull the long front pieces back with some gel or just part the hair down the middle. This style requires a good bit of maintenance.


Wednesday, June 2, 2010

Styling a bob hairstyle

http://www.wonderhowto.com/how-to-style-bob-hair-cut-247689/

The bob is a hair cut that will never go out of style. The link above is to a video showing just how to perfectly style a bob hair cut. To begin creating the style the hair is teased on both sides and the back. A boar bristle brush is used to smooth the hair after teasing. A product is used in the top rear section of the hair. This style can go from day to night. It is a simple yet sophisticated style. Below are pictures of various bob styles...


Victoria Beckham's style is definitely not the traditional bob. This is a way to add some funkiness to a bob. She has some really short layers and some extremely long pieces in the front.


Bangs are sure to spice up any hairstyle but they especially make this bob style.

This bob is very simple and easy to style.

Thursday, May 27, 2010

Hair Straighteners

I guess I probably starting straightening my hair at the beginning of college. Wow! I can't imagine what I would do without my straightener now. I started out using a mega straightener from Sally's; kind of like how my first cell phone was the size of a VCR. I have been through many straighteners some that have been cheap and others that have been pretty pricey. Of course, for the past several years I have been using my Paul Mitchell straightener which I absolutely cannot live without. It just makes my hair feel so soft and look so smooth.

Most of us know how to use out straighteners but, I have posted a video and some tips that are very helpful. Here is a link to the video:
http://www.videojug.com/film/how-to-use-hair-straighteners

Step 1: You will need
-Hair straightener
-comb
-round brush
-heat protective serum

Step 2: Straighteners
Ceramic straighteners are recommended because metal straighteners are a cheap alternative especially if you are straightening often.

Step 3:Hair preparation
If you blow dry your hair before straightening, angle your hairdryer downwards and brush through while you are drying. A heat protective serum will prevent your hair from becoming damaged by the heat.

Step 4: Straightener Preparation
Your hair straightener will need some time to heat up (always follow manufacturer's instructions).

Step 5: Straightening
Clip up most of your hair, leaving one manageable section. Take part of this and put in the straightener. Start at the root and slowly work your way down. Repeat the action until the hair straightens. Keep working in sections to straighten the rest of your hair. Using a comb will ensure that the hair is evenly spread in the straightener. Go over the ends of your hair again to disguise the individual sections.

Step 6: Styling
A shine spray or lock out lotion is recommended to maintain the style.

Tuesday, May 25, 2010

Summer 2010 glominerals products

I have written about the glominerals makeup line several times because I absolutely love it. In my opinion it gives me a flawless look that no other line of makeup can achieve. I am really excited about the Summer 2010 glominerals products that are now available.


Every year when summer rolls around I feel so self conscious of my extremely pale skin. I have tried several different sunless tanning lotions and they all seem to leave me with that orange, fake tan look. Of course, I want to have healthy skin so, for me to lay in the sun for hours is unheard of. I have tried the gloUltimate body bronzing kit and I love it. These products give me that natural sun kissed look without all of the damaging sun rays. These products are very easy to apply just apply the glisten lotion first, then the bronze lotion and lastly the glo lotion.


The other summer 2010 glominerals product is the gloCheeksheen in peachy. I love this product and the color is perfect for summer. The thing that I love most about this product is that it can be used on cheeks, eyes and basically anywhere that I want to add a little peachy glo.


Thursday, May 20, 2010

Top 10 Reasons You Should See Your Hairdresser


I am sure that we can all agree that we love to visit our hairdresser. Just think about it we leave there looking and feeling our best. For me it is my time to get pampered and to feel like a queen! Listed below are the Top 10 Reasons Why We Should All See Our Hairdresser...


#1

If you would like to change your hair color you should definitely see your hairdresser. He or she could consult you on the best hair color for you hair and skin tone.


#2

If you want a new haircut maybe, a cute summer cut! Your hairdresser could give you ideas for different haircuts that will fit your lifestyle.


#3

Highlights! Most people don't realize that there are different colors of highlights...they aren't just all bleach blond! I love highlights especially in the summer!


#4

If an up-do is needed for a special occasion. There is so much to do for special occasions so, why not leave your hair to your hairdresser?!


#5

If you would like a chemical hair straightener/relaxer. This is definitely becoming very popular because so many people want straight hair.


#6

If you would like to try hair extensions. Mostly hair extensions are used for special occasions and can be very tasteful if done properly.


#7

If you are getting married you should definitely see your hairdresser. Always go in for a consultation before the big day that way both of you are "on the same page".


#8

If you hair needs to be thinned out. Your hairdresser has a special technique with special shears and should be able to help.


#9

If you are pregnant. Many women choose to do something really drastic when pregnant because of their out-of-control hormones. Definitely, see a hairdresser before doing so.


#10

If you want to try bangs. There are several different types of bangs and your hairdresser will help you decide which are best for you and your face shape.


I thought these were some fun reasons why we should all stick with our hairdressers. Heaven knows that I couldn't live without mine!

Tuesday, May 18, 2010

Simple Summer Styles

In my opinion this time of year is a super busy time, almost as busy as the month of December! Between the every weekend weddings, graduations of all levels and of course, the first days of the summer season it is hard to find time for myself. Even though life is so busy right now I still want to look good especially, when I am attending so many events. I have found and want to share some super cute, easy hairstyles for the summer.


One of my favorite things to do is to put my hair in a messy bun. A high or low bun is a popular hairstyle this summer. I just put my hair in ponytail and wrap my hair around the rubber band and then pin with bobby pins. Occasionally, I have been accessorising with a cute black flower that I pin in my hair!


Something else that is really popular for girls with long hair, is a ponytail. I love to wear my hair in a ponytail! A ponytail can be dressed up by wrapping a strand of hair around the rubber band.


A super hot look for the summer is a long side braid. I don't wear braids very often but, think I will start. Also, micro braids and cornrows are some different ways that you can wear a braid.


Of course, when I don't have the time to even do these really simple styles I just accessorise usually with a headband or my black flower that I mentioned earlier! Also, I was glad to hear that a messy, tousled look is another popular style for this year. The look can be achieved by using hair wax and mousse. So, when I don't even have time in this busy life to accessorise at least I know that my mess of hair will be considered a "tousled style"!

Thursday, May 13, 2010

Paul Mitchell Smoothing Products


My favorite Paul Mitchell product line is the smoothing line. I have used all of the products in this line and each product does a great job of making my hair silky, smooth.

I use the Super Skinny Serum more than any of the other smoothing products. It helps by conditioning my hair, smoothing it and adding shine. Another perk that I have found is that is helps reduce drying time and speeds up styling time. I do not blow dry my hair without using this product first and I definitely don't leave town without it!

When I am not using the Paul Mitchell Tea Tree shampoo and conditioner then I am using the Super Skinny Daily Shampoo and Super Skinny Daily Treatment. The daily shampoo and treatment make my hair feel so soft while adding a protectant to my hair. The protectant is very important because I always blow dry and straighten my hair so, there could be a lot of damage.


The Super Skinny Relaxing Balm is also a hair necessity, especially for us Charleston girls. This product has a humidity resistant ingredient which helps hair last in any type of weather. Also, the final two smoothing products are the Gloss Drops and the Straight Works which are great finishing products. These products are sure to make the finishing touches as smooth as possible!
I would highly recommend these products to anyone. If you would like to try the products out stop by Fix Salon Studio.